You open your DAW. You place ideas here and there. Then you spend your time scrolling up and down and clicking all over the project to remember where you placed that particular sound. Save lots of time with a little bit of preparation that we’re going to go through now.
The best DAW?
First thing first, one question: what is the best DAW?
The answer? Yours!
Some people swear by Ableton Live, Logic, Cubase, Bitwig, FL Studio, Pro Tools, etc. They are all good. None is perfect. Some are more suitable to certain people’s approach. But generally, the best one is the one you know the most, the one you immediately know what to do when you want to perform a certain task.
I’ll assume here that you have a good level of mastery of your DAW, whichever is your weapon of choice.
Even before going inside your DAW, the first place in which you want to find any kind of data in a breeze is your hard disk.

first, your computer…
What’s in your computer and where is it?
Have your samples in one big folder (and clear subfolders), not all over the place. If they’re not well organised now, plan a few sessions to fix this, you’ll be thankful later. It’s more of an administrative task than anything else, but it’s important that you have a system which allows you to get quick reflexes when you need a specific sample.
Have your music software in an easy to find location. Same goes for presets and user-defined presets.
Have your music projects in one big folder, not all over the place. You can have some major subfolders like, for example, ‘Originals’, ‘Remixes’, ‘Food For Thought’, ‘Collaborations’, ‘Templates’…
By the way, everything is saved on at least an external disk, ya? And these backups are up to date, ya? These things do crash. I insist (learned the hard way): these things really do crash.
Oh, and don’t do software, OS or DAW upgrades in the middle of a project or when you have a deadline, as that’s exactly when things will go wrong (you know that!).
And if you really want to be in the zone when working on a music project, disconnect Wifi, bluetooth, screen saver, screaming babies, etc.
So, now that that your hard disk is not too messy and reasonably well organised, let’s open your DAW.

organise…
You can start right away to work on your masterpiece.
Nothing wrong with that, but there are some tasks that are repeated from project to project and which can be done once for all. Opening your DAW to a workspace which is familiar to you will make save you many minutes on this project, and ultimately many hours by the end of the year.
Create a project template
A project template allows you to start work immediately when inspiration strikes.
- The typical template should have:
- Coloured groups and some empty audio and/or MIDI channels in each group
- An EQ on each channel
- An EQ and a compressor (sometimes called glue compressor) with light settings on each group or bus
- Some send/return channels (minimum 1 delay and 1 reverb; can be more creative with a long reverb, a short reverb, a compressor, a specific effect…)
- Each time you start a new project, you open the template and save it with the name of the new track (can be a temporary name) in its proper location
Group your channels by category
It’s easier to find a specific one, to apply effects on a group, to make stems.
- Some DAWs allow you to make groups. Some don’t but allow you to make buses. Whichever way, it’s a good idea to regroup the channels by type.
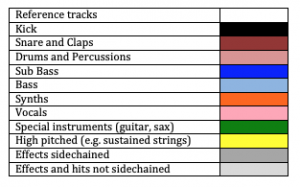
- A possible grouping could be:
- Reference tracks
- Kick
- Snare and Claps
- Drums and Percussion
- Sub Bass
- Bass
- Synths
- Vocals
- Special instruments (guitar, sax, high sustained strings,…)
- Effects sidechained
- Effects not sidechained
- This is just a suggestion, the most important is that you have a grouping structure that you feel comfortable with.
- As you make more tracks, having a standardised grouping structure will help finding a specific channel very quickly, instead of browsing through 50 or 100 channels thrown together randomly.
Label and colour everything
Label all your channels and samples; colour code them; sort and group them. Yes, it does save time!

- You could allocate a colour to each of the groups that you have defined earlier, and to each of the channels composing this group
- An example, re-using the one we’ve seen earlier:
Re-use
When creating a sound you like on a plugin, or a chain of effects you like, save them as user presets for future use.
Not only this will make your life easier should you want to use a sound or effect you’ve used in a previous project, but this will help in building your sound palette and, by extension, your sound.
*****
These organisational tools may sound a bit boring to implement, but they will help you work faster and not lose momentum when inspiration strikes!
JP Lantieri